AIR Overview

What is AIR?

AIR is a self-service platform which enables Automated Image Retrieval (AIR) from UCSF’s and ZSFG’s clinical and research picture archiving and communication system (PACS). AIR is capable of automated deidentification of header data but cannot identify or remove PHI in the pixel data of images. Investigators opting for self-service who need to deidentify their images are responsible for manually inspecting the images and removing PHI from pixel data themselves. Additionally, investigators using this service must arrange for creating discs or transmitting to central repositories on their own.

Who can use AIR?

For UCSF AIR - Anyone with a UCSF Medical Center ID who is listed on an active IRB-approved study

For ZSFG AIR – Anyone with a Department of Public Health (DPH) Active Directory (AD) account, who is listed on an active IRB-approved study. If you are a researcher internal to ZSFG, you most likely already have a DPH AD account. To get a DPH AD account, please create a ticket with the UCSF IT Help Desk and request access to ARF: Account Request Form (Campus, SOM, ZSFG/SFGH). Please make sure that the account type is “DPH Access Request Only – DPH access only when no UCSF access is needed”. Once the specified account type is clicked, scroll down to the request “DPH AD account requested and DPH Annual Training/ SFLearning POI requested”, as seen below:
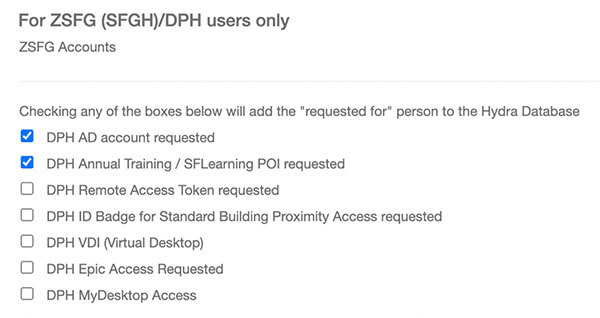
For ZSFG AIR users

Please use Lorel Hiramoto as the Authorized Approver when requesting DPH User account access using the ARF form. And Non-Clinical reason for Annual training classification.

How do I request AIR access?

Complete the UCSF AIR Access Request Form.

Who pays for AIR?

The Principal Investigator (PI) of each study pays a yearly fee per IRB. This fee provides access for the PI and up to 10 study coordinators. AIR charges are assessed per-IRB covered research project at project startup and at each renewal of the IRB. AIR supports retrieving imaging studies one-by-one or in batches. Charges vary based on the number of studies authorized for retrieval.

AIR Charges 

Clinical Research Coordinators – AIR Build Download
 

User Guides

Current or future AIR users may be interested in the following AIR user guides: 


AIR FAQs

How do I log into AIR?

After establishing a secure VPN connection using Pulse Secure, navigate to below stated links in any browser for:

I tried accessing the AIR website, but it won't load. Why? What do I do? 

You must establish a secure VPN connection via UCSF pulse secure to access AIR. For more assistance configuring a VPN connection, please visit the UCSF Information Technology website.

What software does AIR require?

AIR requires a web browser (e.g. Google Chrome, Firefox, or Safari) to retrieve data. To view imaging data, you will need a DICOM viewer such using Horos. To view and redact PHI from imaging data, you will need DicomCleaner (available for Mac or Windows).

Will AIR anonymize my data?

It depends. AIR deidentifies only the header or metadata portion of the files. Some images may contain "burnt in" pixels that cannot be redacted by AIR's anonymization algorithm. Therefore, it is the user’s responsibility to review all imaging data to ensure it is anonymized prior to its release. Please note, that for images accessed via UCSF AIR, RadCRC Core at [email protected], can be reached for questions or assistance.

“Burnt in” pixels represent visible data on images that cannot be de-identified using most anonymization algorithms including that used in AIR. These can be found in imaging data types which include but are not limited to ultrasounds, screenshots, dosage reports, and post processed images. “Burnt in” pixels must be manually redacted (also known as “blacked out”) using a program such as DicomCleaner.

How do I know if there is PHI in the images I retrieved from AIR?

View your data using Horos, DicomCleaner, or any other DICOM viewer.

For PC users, please view your data using RadiAnt.

I found PHI in the data I retrieved from AIR. How do I remove it? 

Follow this guide from DicomCleaner.

What is Full Service and how do I request it?

**Please note that this service is only available for images accessed via UCSF AIR.

Full service is a labor-intensive process that is charged per imaging study (i.e. charge assessed for each accession number). This includes complete deidentification of header data, manual inspection of the images to identify PHI in the pixel data, removal of any PHI found in the images from the pixel data and transfer of the deidentified files to a disc or across the Internet to a central study repository. Please see this webpage for information on Core Services recharge rates.

I downloaded a bulk data retrieval, but none of the file names in my download folder match the download name I entered. Why? What do I do? 

This occurred because of your Safari browser settings automatically unzip compressed downloads. To fix this issue, Deselect the box found in Safari > General > Open “safe” files after downloading.

How do I get a DICOM destination setup to receive my large bulk requests? 

To request this service, please create a ticket with the UCSF IT Help Desk.

What if I just want a few images for a case report? 

Individuals who want a few images for a case report can access and present these data via eUnity (webpacs.ucsf.eduwithout IRB approval. Everyone with access to APeX has access to eUnity already.

After opening the study, select the Export tab at the top, navigate to the desired image and then click the icon with an arrow pointing down into a tray. That will allow one to retrieve images in JPEG or PNG format, which should be sufficient for slides or publication.

If one really needs DICOM format and don’t want to pay the standard research rate, then one must write a justification for why they really need DICOM for a case report and why they can’t pay to support it. Please email this justification will be reviewed by John Mongan, MD, PhD.